Note
Any values below that are in brackets indicate where you should substitute values that are appropriate for you (such as a username). Unless indicated, the brackets should be removed.
Processing Novaseq Runs
Important
Reading the section on directory structure may prevent some headaches in the long term.
Processing the data for Novaseq runs consists of two major steps: demultiplexing and alignment
Demultiplexing
Modern sequencers produce many more reads for each run than is necessary for any one sample, thus samples are typically pooled together and sequenced together. To be able to distinguish the data for each sample, the samples are amplified using PCR and a unique set of i7 and i5 primers. These primers have a defined sequence that results in a barcode being added to each sample that the program bcl2fastq can use to separate the individual samples out from the pool.
The sequencing data should be delivered by the Clinical Genomics Center as bcls placed in a folder either on the group folder on Walnut or in Object Storage. The directory should look something like the tree below:
.
├── Config
├── Data
├── InterOp
├── Logs
├── Recipe
├── Thumbnail_Images
├── CopyComplete.txt
├── RTA3.cfg
├── RTAComplete.txt
├── RunComplete.txt
├── RunInfo.xml
├── RunParameters.xml
└── SequenceComplete.txt

1346 directories, 11526 files
For the most part, you do not need to worry about the actual structure. and really the only subdirectory of interest is the Data directory. This contains the “basecalls”, which are the files that need to be converted to FASTQs for use in the alignment section:
├── Data
└── Intensities
   ├── BaseCalls
   │   ├── L001
   │   │   ├── C1.1
   │   │   │   ├── L001_1.cbcl
   │   │   │   └── L001_2.cbcl
   │   │   │──...
   │   │   │   └──...
   │   │   ├── s_1_1101.filter
   │   │   ├── s_1_1102.filter
   │   │   ├── s_1_1103.filter
   │   ├── ...
   │   │   ├── ...
   │   │   │   └── ...
   └── s.locs
SampleSheet
To demultiplex these files, you will need to use the pool sheet that was used when the sample pool was created to write a “SampleSheet” similar to what is shown below:
[Header] |
|||||
Date |
5/31/2019 |
||||
[Reads] |
|||||
100 |
|||||
100 |
|||||
[Settings] |
|||||
Adapter |
AGATCGGAAGAGCACACGTCTGAACTCCAGTCA |
||||
AdapterRead2 |
AGATCGGAAGAGCGTCGTGTAGGGAAAGAGTGT |
||||
[Data] |
|||||
Lane |
Sample_ID |
Sample_Name |
Sample_Project |
index |
index2 |
1 |
sample1 |
sample1 |
run1 |
GTAACATC |
CAGCGATT |
1 |
sample2 |
sample2 |
run1 |
ATTATCAA |
CGACTCTC |
1 |
sample3 |
sample3 |
run1 |
TGCTGCTG |
GTCCTCAT |
2 |
sample4 |
sample4 |
run1 |
GTAACATC |
CAGCGATT |
2 |
sample5 |
sample5 |
run1 |
ATTATCAA |
CGACTCTC |
2 |
sample6 |
sample6 |
run1 |
TGCTGCTG |
GTCCTCAT |
3 |
sample7 |
sample7 |
run1 |
GTAACATC |
CAGCGATT |
3 |
sample8 |
sample8 |
run1 |
ATTATCAA |
CGACTCTC |
3 |
sample9 |
sample9 |
run1 |
TGCTGCTG |
GTCCTCAT |
4 |
sample10 |
sample10 |
run1 |
GTAACATC |
CAGCGATT |
4 |
sample11 |
sample11 |
run1 |
ATTATCAA |
CGACTCTC |
4 |
sample12 |
sample12 |
run1 |
TGCTGCTG |
GTCCTCAT |
The Lane in which the sample was run should correspond to the pool that was submitted to the Genomics Core. The Sample_ID and Sample_Name can be identical (I don’t know what the difference is) and should match what is in the master NovaSeq_Sample_List. Sample Project will be used to name the fastq output directory. index and index2 are the i7 and i5 indices, respectively.
All of the Novaseq S4 runs to date (2019/07/19) have been S4 PE100 runs. If this changes, values in the [Reads] section will need to be changed. Likewise, if the read adaptors change, the values in the [Settings] section will also need changing. Otherwise, these can be left as is.
Important
Make sure you save the file as a csv
Running bcl2fastq
If the Samplesheet.csv file created above is not already in the run directory, move it there now. ssh into Walnut and load both the bcl2fastq and slurm modules
smithm@walnut:~$ module load bcl2fastq
smithm@walnut:~$ module load slurm
Navigate to the directory containing the files. Since there are no special settings that need to be setup or passed to slrum, you can submit the job directly from the commandline:
srun \
    --mem=64 \
    --cpus-per-task=16 \
    --partition=serial \
    bcl2fastq \
    --output-dir=./fastqs
    --loading-threads 4
    --processing-threads 8
    --writing-threads 4
Warning
If you submit a job from the commandline as above, it will terminate if you logout or otherwise lose your terminal connection. To prevent this, you can either prefix that command with nohup to run it in the backgroup or start a tmux session prior to starting the job.
Alternatively, use a text editor to create a batch script:
#! /bin/bash -l

#SBATCH -J {JOBNAME}
#SBATCH -o bcl2fastq_demux.log
#SBATCH --mail-user={YOUR EMAIL ADDRESS}
#SBATCH --mail-type=END,FAIL
#SBATCH --mem=64
#SBATCH --partition=serial
#SBATCH --nodes=1
#SBATCH --cpus-per-task=16

module load bcl2fastq
bcl2fastq \
    --runfolder-dir=$PWD/ \
    --output-dir=$PWD/fastqs \
    --loading-threads 4 \
    --processing-threads 8 \
    --writing-threads 4
and submit the job:
smithm@walnut:/Volumes/guth_aci_informatics/{NOVASEQ_DATA_DIRECTORY}$ sbatch demux_script.sh
Note
Using a batch script avoids the problem of early termination of the job due to terminal disconnection while making it easier to be informed by email when the job is complete. To follow the progress of the run, use the command tail -f bcl2fastq_demux.log.
Alignment
bcl2fastq translates the sequencing data to the more usable FASTQ standard. That data, in turn, can be analyzed to determine how well the sequencing run went and for transcriptomics analysis after it is aligned to a reference transcriptome.
Snakemake
Because there are potentially hundreds to thousands of files that all need to be processed using a series of separate programs, all of which need tremendous resources, we use the workflow manager Snakemake to coordinate passing files between programs and submitting jobs to a job manager.
The workflow has been designed to work both on the local cluster, Walnut, and our Google Cloud-based cluster, M6. Use of the pipeline on either is very similar, though setup differs slightly. Both cases assume that Miniconda3 has already been successfully installed.
Walnut
Since there is the possibility of a large number of large files being created, it is best to use the Scratch drive.
Clone the respository:
git clone --single-branch --branch local https://gitlab.com/milothepsychic/rnaseq_pipeline.git {PROJECT_DIR}/pipeline
where
$DIRECTORY_NAMEis the name of a directory you would like to create for this analysis.
If this is the first time running the pipeline, install the conda environment. This will install Snakemake and any other programs used by the pipeline:
user@walnut:/s/guth-aci/project_dir/pipeline$ conda create --file environment.yml
Activate the environment:
user@walnut:/s/guth-aci/project_dir/pipeline$ source activate snakemake
Edit the file
config.ymlTypically, the only settings you should need to change are thePROJECT_DIR, which should be set to the same$PROJECT_DIRyou used with git above, andRAW_DATA_DIR, which will depend on the location to which bcl2fastq wrote the files.Assuming that you have setup folders as above and correctly changed the settings in
config.yaml, you can start the pipeline with:
user@walnut:/s/guth-aci/project_dir/pipeline$ ./run_script.sh
Warning
As above, you will probably want to use tmux to prevent the pipeline from shutting down should your terminal session disconnect prematurely.
M6
Should there be some issue with being able to run the job on Walnut (such as a heavy use), there is a cluster setup for this purpose on Google Cloud.
Setup is largely the same, though there are a few key differences. First, it is useful to understand the architecture of the cluster. M6 consists of one login node with which users interact, a controller node that coordinates job submissions and file serving, and anywhere between 4 to 32 compute nodes (depending on the current load) that actually process jobs. The compute nodes all have 16 CPU cores, 104 GB of RAM, and 50 GB solid state drives - they are setup to work on data, not store it; the controller node, on the other hand, has a 5 TB drive that is meant to be used for storage. This large storage drive is made available to the login node at /mnt/disks/sec; however, so if you start the login node without the controller, you will be unable to find most of the files.
To process files on M6:
Create a directory for the analysis pipeline and files on M6:
(base) [user@m6-login1 ~]$ cd /mnt/disks/sec
(base) [user@m6-login1 ~]$ mkdir -p project_dir/data
Where
project_diris a new directory for this run.
Clone the pipeline repository:
(base) [user@m6-login1 ~]$ git clone https://gitlab.com/milothepsychic/rnaseq_pipeline.git /mnt/disks/sec/project_dir/pipeline
Activate the
snakemakeenvironment:
(base) [user@m6-login1 pipeline]$ conda activate snakemake.If that fails, change directory to where you cloned the pipeline and install the environment:
(base) [user@m6-login1 ~]$ cd /mnt/disks/sec/project_dir/pipeline
(base) [user@m6-login1 ~]$ conda create --file environment.yml
Copy the fastqs from whatever local location they are at (on
flotsamorobject storage), to a bucket, and then to M6. See the Object Storage section on how to setuprclone.
Note
Most likely there is no reason to copy both the bcls and fastqs over to M6. Doing so will only make things take twice as long and drive up data transport costs.
On Walnut:
user@walnut:/Volumes/guth_aci_informatics/$ rclone copy -P local_directory/ google:memory_alpha/datasets/rnaseq/directory_for_this_run
On M6 or Cloud Shell:
(snakemake) [user@m6-login1 ~]$ rclone copy -P google:memory_alpha/datasets/rnaseq/directory_for_this_run /mnt/disks/sec/project_dir/data/raw_dataWarning
As usual, using
tmuxornohupwill be beneficial in the event of a terminal disconnect.
Edit the file
config.ymlTypically, the only settings you should need to change are thePROJECT_DIR, which should be set to the same$PROJECT_DIRyou used with git above, andRAW_DATA_DIR, which should be set to/data/raw_data.Assuming that you have setup folders as above and correctly changed the settings in
config.yaml, you can start the pipeline with:
(snakemake) [user@m6-login1 pipeline]$ ./run_script.sh
Note
While it is not necessary to understand the entirety of how Snakemake functions, that knowledge can be useful when attempting to debug common errors. The site that is linked to above has a decent amount of information, though there are a few key facts that are missing (or at least not outright stated) that are useful for understanding. First, the Snakemake script is written in what is essentially a simpler form of Python, but normal Python code itself is still valid and will function, meaning that if you are so inclined you can add your own functions to the script, use f-strings, or import modules their functions. Second, and most importantly, is that the order in which the rules appear in the script DOES NOT MATTER - Snakemake itself infers the order in which the rules should run by trying to match up the output of one rule with the input of another. So if there is a Rule A like:
rule A:
    input: "some_raw_file.txt"
    output: "rule_a_output.txt"
    shell: "do_stuff {input} {output}"
and a Rule B like:
rule B:
    input: "rule_a_output.txt"
    output: "final_file.txt"
    shell: "other_function {input} {output}"
Snakemake will determine that since the input of Rule B depends on the output of Rule A, that Rule A must run first. As part of the invocation of Snakemake, you can specify a ‘target rule’ (if you don’t, it will default to a rule named all) which should define the pipeline’s final outputs - any rules that are found to be necessary to create those final outputs will be run. In the event that it appears that certain rules are being skipped, it can be helpful to look at the job graph that Snakemake creates. This can be printed out with the command:
user@walnut:/s/guth-aci/analysis_dir$ snakemake --configfile config.yaml --snakefile Snakefile --rulegraph $FINAL_TARGET | dot -Tpng > graph.png
where $FINAL_TARGET is your overall target rule. This should result in a simplified version of the rules dependency for one example sample:
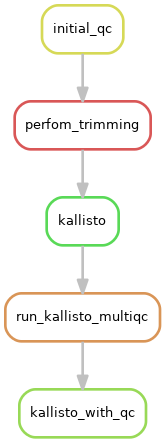
Alternatively, if you wish to see the entire job graph for all samples, substitute --dag in place of --rulegraph. Additionally, if the image produced is of too low a quality, you can create an SVG by substituting -Tsvg in place of Tpng.
Important
The most likely problem your pipeline doesn’t run properly? The directories in config.yaml are not set correctly.
Directory structure
Before beginning, it is worth it to take a moment and observe the directory structures used for the projects. It may seem silly, but maintaining strict file placement discipline will save both future you and others time and sanity when later trying to find files or determine if something has been analyzed. For example, with Novaseq run S4.5 I ended up with the following directories:
    .
├── data
│   ├── raw_data
│   │   ├── Config
│   │   ├── Data
│   │   │   └── Intensities     <-- location of bcls
│   │   ├── InterOp
│   │   │   └── ...
│   │   ├── Logs
│   │   │   └── ...
│   │   ├── Recipe
│   │   ├── Thumbnail_Images
│   │   │   └── ...
│   │   └── fastqs
│   │       ├── Reports
│   │       ├── Stats
│   │       └── s45             <-- output for bcl2fastq.  Matches the value for "Sample_Project" in the SampleSheet.csv
│   └── results                 <-- multiqc report
│       ├── kallisto
│       │   └── ...            <-- directory for each sample containing the abundance.h5 files
│       ├── qc
│       │   └── initial
│       └── trimmed
├── logs                        <-- logs created during processing
|   ├── fastqc
|   ├── trimmed
│   └── kallisto
└── pipeline                    <-- location of Snakefile
    ├── bbmap
    ├── fastqc
    ├── minimal-snakemake
    └── rnaseq_tools